You are using an out of date browser. It may not display this or other websites correctly.
You should upgrade or use an alternative browser.
You should upgrade or use an alternative browser.
Inside the Roto 85FS
- Thread starter TonyHallo
- Start date
TonyHallo
640cc Uber Pimp
So since I reinstalled the engine I have been getting high temperature alarms on the plug sensors. The sensors previously installed were touching both the upper part of the cylinder head and the sparkplug cap so I suspect they were indicating low temperature. I have the alarm set at 300F.
There is no published info on what the high temp should be and I picked 300 f because that I use on two stroke cylinders. While the engine was apart I milled a relief in the head to provide clearance for the sensors and since then the temperatures have increased.
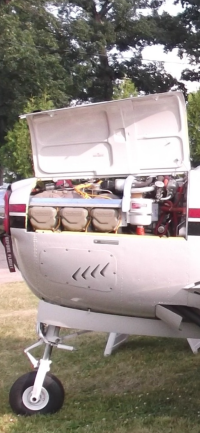
A Google search provided no insight however Google AI indicated that 300f was the high limit. When I questioned the source for the limit AI reported that it is not published however the limit was determined by experienced users of the engine. I provided a verbal description of the install and the first recommendation was to add air dams behind the cylinders to direct the airflow up and down the back side of the cylinder. The dams are installed on the left side in the photo below.
Before we go further let me explain the airflow path. Air enters the cowl though the scale like openings on each side of the spinner. There are also openings where the oil cooler and air cleaner reside in the full scale plane. These openings were never filled and provided an approximate double the size of the normal inlets. Air exits the cowl from the cheeks on both sides of the cowl since the cowl is about 3/4" wider than the fuselage, additionally there is a scale opening on the bottom of the cowl that looks to about 1" x 4" with a lip provided. I would estimate there is 2 1/2 to 3 times the exit openings than that of the inlets on each side of the spinner.
 .While the engine was out of the plane, the cowl was reinstalled and any gaps between the firewall baffle and the cowl were glassed with release package tape applied to the cowl. End up with a perfecting baffle with minor leakage.
With the engine reinstalled with the air dams, two additional temperature sensors were added along with an air speed pressure sensor was added for measuring the differential across the baffle plate in ft per second.
The air dams had little if any effect. The two temperature sensors were eye opening however. One sensors measured the air on the cold side and the second measured the air leaving the left cylinder. The inlet temperature steadily increased through out the flight (About 8-9 minute scale routine). Seen temperatures as high as 127F while the exit temperature was typically 30 higher than the inlet.
While flying this past week the air cleaner opening was covered with packing tape and the next flight seemed slightly better. The follwing flight the oil cooler was covered and that flight got worst. These results were reported to Google AI along with screen shots of the telemetry data. At this point I indicated to Google AI that I planned to insulate the exhaust tubes since the reside in the cold side of the baffle and my scale exhaust routing adds additional exposure right in front to the cylinders. See photo.

Google AI recommended using a product called Fire Sleeve rather the automotive header wrap. I ordered 5' of the product and elected to wrap the tubes with automotive insulation then wrapped the outside with Teflon tape. I suspect tightly wrapping the Teflon tape compressed the insulation and rendered it useless. The air cleaner inlet was blocked with balsa wood and the oil cooler opening is filled with 50% opening screen to simulate the oil cooler.
The next two flights showed little improvement, the insulation didn't help.
Yesterday I decided to enlarge the opening on the bottom of the cowl. While the stock cowl has and opening of about 1" wide, the effective is reduced by about 3/8" when the cowl is slide over the fuselage. I made the opening 3/4" wider and 1 1/2" longer, the scale lip was replaced with a piece of styrene glued into position. The Fire Sleeve arrived yesterday as the cowl mods were ongoing.
First flight today 73F ambient, no alarms, maximum air inlet 107F.
Second flight the header wrap was removed and the Fire Sleeve installed. 82f ambient, max inlet temperature 105f, no alarms.
The high speed needle is set just a the point of a rich miss at WOT, I plan to lean it a screw driver blade width next time out.
I will also note the the air speed indicator showed pressure drop across the baffle as soon as the engine started and increases with speed.
I might try removing the bottom air dams as another test.
If I Google four stroke air cooled cylinder head temperatures returns 300F to 425F.
There is no published info on what the high temp should be and I picked 300 f because that I use on two stroke cylinders. While the engine was apart I milled a relief in the head to provide clearance for the sensors and since then the temperatures have increased.
A Google search provided no insight however Google AI indicated that 300f was the high limit. When I questioned the source for the limit AI reported that it is not published however the limit was determined by experienced users of the engine. I provided a verbal description of the install and the first recommendation was to add air dams behind the cylinders to direct the airflow up and down the back side of the cylinder. The dams are installed on the left side in the photo below.
Before we go further let me explain the airflow path. Air enters the cowl though the scale like openings on each side of the spinner. There are also openings where the oil cooler and air cleaner reside in the full scale plane. These openings were never filled and provided an approximate double the size of the normal inlets. Air exits the cowl from the cheeks on both sides of the cowl since the cowl is about 3/4" wider than the fuselage, additionally there is a scale opening on the bottom of the cowl that looks to about 1" x 4" with a lip provided. I would estimate there is 2 1/2 to 3 times the exit openings than that of the inlets on each side of the spinner.
With the engine reinstalled with the air dams, two additional temperature sensors were added along with an air speed pressure sensor was added for measuring the differential across the baffle plate in ft per second.
The air dams had little if any effect. The two temperature sensors were eye opening however. One sensors measured the air on the cold side and the second measured the air leaving the left cylinder. The inlet temperature steadily increased through out the flight (About 8-9 minute scale routine). Seen temperatures as high as 127F while the exit temperature was typically 30 higher than the inlet.
While flying this past week the air cleaner opening was covered with packing tape and the next flight seemed slightly better. The follwing flight the oil cooler was covered and that flight got worst. These results were reported to Google AI along with screen shots of the telemetry data. At this point I indicated to Google AI that I planned to insulate the exhaust tubes since the reside in the cold side of the baffle and my scale exhaust routing adds additional exposure right in front to the cylinders. See photo.
Google AI recommended using a product called Fire Sleeve rather the automotive header wrap. I ordered 5' of the product and elected to wrap the tubes with automotive insulation then wrapped the outside with Teflon tape. I suspect tightly wrapping the Teflon tape compressed the insulation and rendered it useless. The air cleaner inlet was blocked with balsa wood and the oil cooler opening is filled with 50% opening screen to simulate the oil cooler.
The next two flights showed little improvement, the insulation didn't help.
Yesterday I decided to enlarge the opening on the bottom of the cowl. While the stock cowl has and opening of about 1" wide, the effective is reduced by about 3/8" when the cowl is slide over the fuselage. I made the opening 3/4" wider and 1 1/2" longer, the scale lip was replaced with a piece of styrene glued into position. The Fire Sleeve arrived yesterday as the cowl mods were ongoing.
First flight today 73F ambient, no alarms, maximum air inlet 107F.
Second flight the header wrap was removed and the Fire Sleeve installed. 82f ambient, max inlet temperature 105f, no alarms.
The high speed needle is set just a the point of a rich miss at WOT, I plan to lean it a screw driver blade width next time out.
I will also note the the air speed indicator showed pressure drop across the baffle as soon as the engine started and increases with speed.
I might try removing the bottom air dams as another test.
If I Google four stroke air cooled cylinder head temperatures returns 300F to 425F.
WMcNabb
150cc
Interesting problem. If I understand the description with your accompanying photos, the ducts bolt to a baffle plate, ahead of the firewall.
Are the front to the ducts sealed against the cowl openings on either side of the spinner? What about the baffle to the cowl?
Note all the sealing between the baffle and the cowl, along with size the cowl flaps and gills on this full scale Bonanza. Obviously a lot of air moves through due to the speed of this airplane. Worst case is climbing on a hot summer day, but this engine stays cool.
Attachments
TonyHallo
640cc Uber Pimp
The baffle to the cowl is very close fitting, and gaps were filled with epoxy and glass against release tape applied to the cowl.
The area downstream of the cowl openings is open, looking at the photo above you can see the exhaust pipes are in the way. I just ordered 1"diameter Fire Flex to slip over the already installed 3/4".
The area downstream of the cowl openings is open, looking at the photo above you can see the exhaust pipes are in the way. I just ordered 1"diameter Fire Flex to slip over the already installed 3/4".